How to Start a Fire Without a Match

By: Charles W. Bryant
Men outdoors working in nature's beauty.
The campfire these sportsmen built is really top-notch and aces for cooking food.
Lambert/Hulton Archive/Getty Images

If you have a fireplace in your home, chances are you have a gas line that helps you get it going. If you don't, you probably have some nifty long matches, a lighter and a stack of newspaper on the hearth. But what if you got lost in the wintry woods without a match or lighter? What if you washed ashore on a deserted island, soaked to the bone? You may not think so, but it could happen to you — just ask Tom Hanks. His movie character used wits and determination to survive in "Castaway."

Along with water, fire is the most important thing you need to survive in the wilderness. It provides the following:

Advertisement

  • Warmth in cold conditions
  • A means to purify water or sterilize tools
  • Heat to dry wet clothes
  • A cooking flame
  • A sense of security and comfort
  • Smoke for rescue signals
  • Heat to melt snow and ice for drinking water
  • A means to scare away dangerous animals
  • Light for your shelter or for torches
  • Smoke to help repel insects

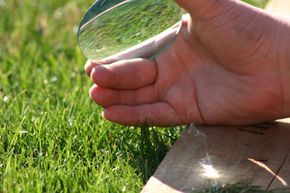
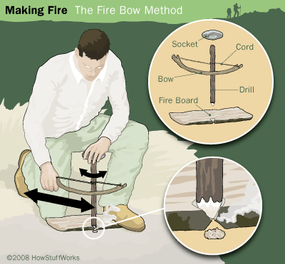
There are many methods you can use to start a­ fire without a match. Some are easier than others, and they all require a bit of practice. If you're an outdoor enthusiast, it's a good idea to practice some of these techniques when you go camping. It can help build your confidence in the great outdoors — and it's a lot of fun.

In this article, we'll look ­at the various methods you can use to start a fire without a match. We'll also fill you in on the best wood to collect and the optimum placement of your survival fire.

Advertisement

Location and Preparation

Woman collects firewood.
A Kazakh woman splits and separates firewood outside of her yurt at the Akejiaer Village.
China Photos/Stringer/Getty Image News

Location, location, location — it's vital in real estate and in fire starting. Your first step to a good campfire should be to survey the land around you so you can choose the best spot. Here are a few things to look for:

  • Dry ground
  • Flat surface
  • Wind protection
  • Proximity to firewood
  • Proximity to your shelter
  • Proximity to water source­

You should already have your fire. Once you've picked a good location, clear away any brush and dig a pit 4 to 6 inches deep and 3 feet across. If there are large rocks nearby, place them around the pit to help contain the coals. Don't ever use river rocks, they will crack and burst when heated. If the ground is snow-covered, build a platform of medium-sized green branches.

Advertisement

After you dig your pit, collect the firewood. Fires need to start small and build up gradually, so gather a variety of sizes:

  • Tinder: easily ignited fire starter
  • Kindling: small twigs to medium sticks
  • Fuel: larger branches and logs

There are many things you can use as tinder — as long as they're absolutely dry. Brown pine needles, fallen leaves, birch bark, bird feathers, cotton balls, lint and dried moss are just a handful of items you can use. If you have a knife, peel some bark away from a pine tree and scrape fine shavings from the trunk. If you use leaves or pine needles, crumple them up into a ball.

Your kindling can range in size from small twigs to larger sticks and should also be dry. Adding moist kindling to your burning tinder will snuff out your fire before it gets started. Break the kindling up into pieces that range in size from 2 to 8 inches.

The fuel is what really gets your fire hot. Look for dry branches under thick trees. Fuel pieces should be 8 to 24 inches long. Birch trees grow near streams and lakes and burn very hot and fast. Spruce trees smoke more in the spring and summer than in the fall and winter. If it's an emergency, don't get too picky — any kind of dry wood will do. Look for lighter knots — bulbous chunks of wood on branches. This is accumulated sap and will burn long and slow.

When breaking larger branches, avoid doing so over your knee — it's a good way to injure yourself. Place one end of the branch against a large rock and use the bottom of your boot and body weight. Another good method is to find two trees very close to each other, place the branch between them, and use leverage until it breaks. If you find a nice long log you can't break, just feed it into the fire little by little.

A good rule of thumb for gathering wood is to get as much as you think you'll need — then double it. You'll go through wood much faster than you think, and the last thing you want to do is run out in the middle of the night. Once you gather enough, stack it near the fire pit in like-sized piles. If you end up with mostly wet wood, do your best to get the fire started, and then stack wet branches and logs around it. As they dry, add them to the fire and replace them with more wet wood.

Advertisement

It Only Takes a Spark

Magnifying glass fire.
The lens method creates a hot spot that will ignite tinder.
badrobot/MorgueFile

You have your fire pit and a nice collection of wood. The only thing between you and a nice evening roasting s'mores is a spark. There are many methods for starting a fire, and some are easier than others. Patience and calm are good practices to employ when attempting to start your fire. The following are techniques you can use with items found or on hand.

Lens Method — this technique involves using a magnifying glass on a sunny day. You can also use a disassembled camera lens or binoculars:

Advertisement

  • Pile some tinder in the center of the fire pit.
  • Hold the lens about a foot from the tinder.
  • Angle the lens so the sun concentrates a small hot spot.
  • The starter should begin to smolder very quickly.
  • Blow on the tinder to ignite it and place small kindling twigs until the fire is stable.

Battery Method — if you're stranded with your car or find wreckage from a boat or plane, you can use the battery to create your spark:

  • Find some wire from the car or wreckage — any engine wire will work.
  • Attach two pieces of wire to each battery terminal.
  • Get your tinder and touch the wires together above it.
  • This should create a spark and the tinder will smolder.
  • Pick the tinder up and blow on it.
  • Once it lights, quickly transfer it to your fire pit and add small kindling.

Soda Can and Chocolate Method — because many people fail to pack out their refuse, chances are you can find a soda can in the woods. If you have some chocolate, toothpaste or powdered cleanser on hand, use this method:

  • Smear some chocolate or an abrasive onto the bottom of the soda can.
  • Use the wrapper or some cloth to rub it into the can to polish it.
  • Add more chocolate as needed and continue to rub for about 30 minutes.
  • Wash the abrasive off the can with some water. Your goal is a shiny, reflective surface.
  • Once you have a good surface, angle the can toward the sun and hold a piece of tinder about an inch away from the center of the can.
  • Like a convex lens, the can will produce a concentrated hot spot and your tinder will begin to smolder.
  • Gently blow on the tinder until it ignites and quickly transfer it to your fire pit.
  • WARNING  do not eat the used chocolate or toothpaste. It contains aluminum and is highly toxic.

Advertisement

More Lighting Methods

Cartoon men shaking hands in vector illustration.

Fire Plow — This technique requires some determination but works well.

  • Find a pie­ce of softwood for your plow board, about 18 inches long and roughly 2 inches wide. Willow and poplar trees work well and are commonly found near streams and rivers.
  • Carve a groove 1 inch wide and 6 to 8 inches long in the center of your plow board, about two inches from either end. Use a knife or the sharp edge of a rock.
  • Find a hardwood stick for your plow. It should be about a foot long and come to a point on one end.
  • Lay the board flat on the ground and insert the plow into the groove.
  • Rub the plow back and forth with moderate pressure to create small bits of wood dust.
  • Once you have a moderate amount of dust, raise the top end of the board up and rest it on your knee. The dust will collect at the bottom.
  • Rub as fast as you can with heavy pressure until the dust smolders. Pick up the board and gently blow until you have a flame you can transfer to your tinder.

Bow and Drill — This is another friction method that takes some time to perfect. You'll need the following items:

Advertisement

  • Socket - flat, hand-size rock with a slight depression on one side
  • Drill - sturdy, straight hardwood stick, 1 to 2 inches in diameter and a foot long
  • Fire Board - flat, softwood board about a foot long, 6 inches wide and one inch thick
  • Bow - flexible and sturdy green stick about one inch in diameter and 18 to 24 inches long
  • Cord - hiking boot laces work well

Once you've gathered your items, it's time to make some fire:

  • Cut a slight, round depression just inside the center edge of the fire board.
  • Notch a V-shaped cut on the underside of the center edge that just meets the depression.
  • Bend your bow stick into a half moon and tie it tight with your boot lace.
  • Place the board on the ground and put a cotton ball-sized bunch of tinder under the notch.
  • Put your foot on the board for stability and loop the bowstring around the drill, resting in the round depression.
  • Place your socket on top of the drill with moderate pressure and saw the bow back and forth. This will twist the drill and create hot, black powder that falls onto your tinder. Before long, the tinder should ignite and you can transfer it to your fire pit.
Vector cartoon illustration of two men shaking hands.

Fire From Ice — this technique is a variation of the lens method using ice instead of a magnifying glass.

  • Find or make a spherical ice lens, about 2 to 3 inches thick in the center. The ice must be clear in order for it to work. If you have a cooking pan, use it to freeze water.
  • Shave away any cloudy ice and carve the block into a round sphere like a magnifying glass.
  • Use the warmth of your hands to shape the ice — the smoother the better.
  • Getting clear ice is the biggest challenge of this technique, and there's no surefire method. The ice around lakes and rivers has a better chance of being clear.
  • After you shape your lens, use the sun to concentrate a hot spot onto your tinder. If it doesn't create a good hot spot, keep shaping your lens.

Advertisement

Lots More Information

Related Articles

More Great Links

  • Bicevskis, Rob. "Fire From Ice." wildwoodsurvival.com, 2007. http://wildwoodsurvival.com/survival/fire/ice/rb/rbfirefromice1.html
  • " How to make a fire in the wilderness." wilderness-survival-skills.com, 2007. http://www.wilderness-survival-skills.com/how-to-make-a-fire.html
  • "Fire from a Can of Coke and a Chocolate Bar." wildwoodsurvival.com, 2007. http://wildwoodsurvival.com/survival/fire/cokeandchocolatebar/
  • "Fire." survivaliq.com, 2007. http://www.survivaliq.com/survival/cold-weather-survival_s8.htm
  • "Fire." wilderness-survival.net, 2007. http://www.wilderness-survival.net/cold-8.php
  • "How to Build a Fire." wilderness-survival.net, 2007. http://www.wilderness-survival.net/fire-4.php
  • "How to Start a Fire." nationalgeographic.com, 2007. 
  • "Survival, Evasion, and Recovery." U.S. Military Field Manual 21-76-1, June 1999.­ http://www.brooksidepress.org/Products/OperationalMedicine/DATA/operationalmed/Manuals/FM_21-76_1/fm21761.pdf

Advertisement

Loading...