A small tear in a tent can worsen quickly, but it's easy to repair even on the trail. Carry mending materials with you to keep your tent secure. mixetto / Getty Images
Whether you take one camping trip a year or one every weekend, the information in this article will help you make the most of your trip. We'll give step-by-step directions on how to fix a tear in your tent, how to make a large tarp, how to resole your hiking boots, and even how to make your own insect repellent. Use these handy tips to ensure a great time in the great outdoors.
First up are do-it-yourself tent repairs. Keep your tent dry and comfortable with the advice on the next page.
Advertisement
For tips on caring for and repairing other types of sports equipment, try the following links:
Learn how to keep your bicycle in top condition, including how to patch a tire, replace a chain or spoke, and tune up the brakes at How to Repair a Bicycle.
How to Maintain a Boat has practical tips for making hull repairs, caring for the outboard motor, and making boat accessories.
If you're a skiier, check out How to Maintain Skis to extend the life of your skis and ski poles.
How to Maintain Golf Equipment leads you step-by-step through regripping and refinishing a golf club.
Skateboarders can get valuable information on taking care of their boards at How to Maintain a Skateboard.
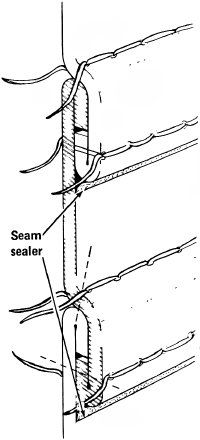
Sew patches shingle-fashion, seams down, to shed water; seal the open bottom edges with seam sealer.
A small tear in a tent can worsen quickly, but it's easy to repair even on the trail. Carry mending materials with you to keep your tent secure.
Tools: small scissors, sewing awl, straight pins, grommet setter.
Advertisement
Materials: for nylon tents -- ripstop nylon repair tape, seam sealer made for nylon; for canvas tents -- taffeta repair tape, seam sealer made for canvas; for both -- waxed thread, scrap nylon screening, grommets.
Time: 10 minutes to 1 hour, depending on the damage.
Most rips, tears, and leaks occur because a tent has been pitched too rigidly; find ways to set up your tent so that it can flex in high wind conditions. Use shock cords wherever possible. Check your campsite for dangerous limbs, projecting roots, and sharp rocks that could cause damage; if you must pitch your tent on a hazardous site, pad sharp rocks and clear away debris before pitching it.
Rips and tears. To mend small tears, cover the damaged area with cloth repair tape -- ripstop nylon for nylon tents, taffeta for canvas tents. Apply a liberal patch to both sides of the tear, smoothing the edges of the tape carefully to prevent snags and leaks. Coat the edges of the patch with seam sealer, on both sides of the tent. Be sure you're using the right sealer; canvas sealer could damage a nylon tent.
Large tears must be sewn closed or patched with repair tape. If the tear is in a part of the tent where extra pressure doesn't matter, turn the top edge of the tear under about 1/4 inch and stitch the turned fabric over the outside of the bottom torn edge, using a sewing awl and strong waxed thread, forming a new seam. Plan your sewing to account for water runoff; turn the edges of the patch to create a shingle effect to shed water, not a shelf to hold it. Make your stitches short and close together; double seams are strongest. To ensure a watertight seal, apply a bead of seam sealer to the bottom edges of the overlap or patch, on the outside of the tent.
Patch holes or tears in tightly stretched areas of the tent with strips of repair tape cut at least 1 1/2 inches longer and wider than the damage; if necessary, overlap strips in a shingle pattern to cover the damage completely. Tape both sides of the damaged area, and seal all edges of the tape with seam sealer, inside and out. If the patch isn't sturdy enough, replace it when you get home with a patch of tent fabric.
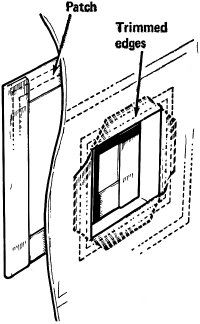
Stitch a patch over the hole on the outside; then trim the torn fabric and turn it under on the inside.
Cut the patch about 3 inches larger than the damaged area all around. Set it over the damaged area on the outside of the tent and pin it in place. Turn the edges of the patch under 1 inch and repin it. Topstitch around the entire patch 1/16 to 1/8 inch from the edge. Topstitch again 1/8 to 1/4 inch in from the first row of stitching and remove the pins. On the inside of the tent, trim the damaged area into a square or rectangle, trimming as close to the damage as possible. Clip the corners in diagonally 1 inch. Turn the cut edges under 1 inch pin them into place, and topstitch close to the edge around the entire hole. Topstitch again 1/8 to 1/4 inch from the first row of stitching, and remove the pins. If desired, make additional topstitching in a quilting fashion to strengthen the patch. Finally, apply a bead of seam sealer to the perimeter of the patch on the outside of the tent.
Reattach torn ties, flaps, windows, and zippers the same way, forming overlapping shingles and applying seam sealer to the finished mend. Patch torn screens with a patch slightly larger than the tear or hole, stitching all around the edges with the awl.
Grommets. Tears around grommets require the removal of the old grommet and replacement of the damaged material. Cut the grommet out with a small scissors, being careful to remove as little fabric as possible. Reinforce the grommet area with repair tape; stick the tape to one side of the fabric and fold it over on itself to produce a double-strength patch over the grommet hole. Stitch the patch into place with a double seam. Set in a new grommet with a grommet setter and seal its edges with seam sealer. Seal the edges of the stitched-in patch with seam sealer on the outside surface of the tent.
Leaks. To stop a leak in the rain fly or upper surface of your tent, apply seam sealer when the fabric has dried out. Leaks in the floor are probably the result of tears. Locate and repair the tear; be certain that the ragged part of your seam is on the inside surface of your tent. Seal this seam. To protect the patch, cover it with repair tape. To prevent any further damage to a waterproof floor, use a plastic dropcloth under your tent.
Another option for protecting yourself from the elements while camping is a tarp. Find out how to make your own on the next page.
For tips on caring for and repairing other types of sports equipment, try the following links:
Learn how to keep your bicycle in top condition, including how to patch a tire, replace a chain or spoke, and tune up the brakes at How to Repair a Bicycle.
How to Maintain a Boat has practical tips for making hull repairs, caring for the outboard motor, and making boat accessories.
If you're a skiier, check out How to Maintain Skis to find out how to extend the life of your skis and ski poles.
How to Maintain Golf Equipment leads you step-by-step through regripping and refinishing a golf club.
Skateboarders can get valuable information on taking care of their boards at How to Maintain a Skateboard.
Advertisement
How to Make a Tarp
Stitch the two panels together with a 1-inch seam; then open the panels, turning the seam side up.
Anyone who camps or has kids who build backyard forts has good use for a big tarp. This inexpensive, easy-to-build version has a myriad of uses; its finished size is roughly 10 feet square.
Materials: 7 yards of 60-inch-wide coated nylon, matches, seam sealer for nylon, cloth adhesive tape, eight grommets, all-purpose thread.
Time: 4 to 6 hours.
Cut the material into two 3 1/2-yard sections. In a well-ventilated room, singe and seal all cut edges of both pieces of material. Light a candle. Hold the fabric with one cut edge stretched between your hands, and carefully pass the stretched edge of the fabric near the candle flame so that the fibers at the cut edge melt and fuse together. This prevents the finished tarp from raveling. Sear the cut edges of both pieces of material, working slowly and carefully around the panels. Blow the candle out.
Place one piece of material directly over the other, coated sides together. Pin together along the seam line. Sew the two pieces of material together lengthwise along one 3 1/2-yard edge, using a sewing machine set to make close stitches; leave a 1-inch seam allowance. Remove the pins along the seam. Open the sewn-together panels to form one large sheet with a seam down the middle, seam side up.
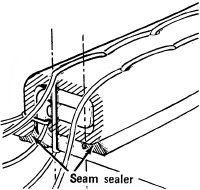
Holding the two seam allowances together, fold them under lengthwise and then fold them again in the same direction to produce a flat-felled seam of five thicknesses. Pin the seam and stitch it in two parallel rows down the tarp, once close to the fold and again close to the original seam. This flat-felled seam is the inside of the tarp. Remove the pins along the seam.
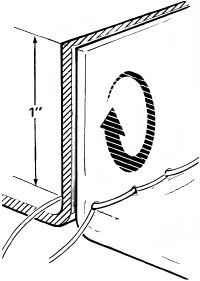
Turn the edges of the tarp under 1 inch and then under again 1 inch to make a 1-inch hem on the inside; pin the hem in place and then stitch it all around close to the folded-under edge. Backstitch at the beginning and end and tie off the thread ends. Remove the pins. For added strength, topstitch close to the edge around the entire tarp. This is all the sewing you'll have to do.
Fold the seam edges under twice to form a flat-felled seam; stitch the seam twice. Seal the open edges, on both sides, with seam sealer.
To complete the tarp, set grommets around its edges within the 1-inch hem. Mark grommet points with chalk in each corner, midway on both of the long sides (parallel to the center seam), and just next to the points where the center seam hits the shorter sides; if desired, place more grommets along the sides of the tarp. Reinforce each marked grommet point with a piece of cloth adhesive tape. On the inside, set a grommet at each reinforced point with a grommet setter.
Finally, apply seam sealer for nylon along the open joints of the center seam, sealing the entire length of both the inner and outer surfaces. Let the sealer dry completely, as directed by the manufacturer, before using the tarp.
If you're a camper who loves to hike, you may own a worn-out pair of hiking boots that are headed for the trash. Before you ditch them, consider breathing new life into them by replacing the soles. The next page will tell you how.
For tips on caring for and repairing other types of sports equipment, try the following links:
Learn how to keep your bicycle in top condition, including how to patch a tire, replace a chain or spoke, and tune up the brakes at How to Repair a Bicycle.
How to Maintain a Boat has practical tips for making hull repairs, caring for the outboard motor, and making boat accessories.
If you're a skiier, check out How to Maintain Skis to find out how to extend the life of your skis and ski poles.
How to Maintain Golf Equipment leads you step-by-step through regripping and refinishing a golf club.
Skateboarders can get valuable information on taking care of their boards at How to Maintain a Skateboard.
Make Your Own Insect Repellent
Apply the repellent as often as needed.
Advertisement
How to Resole Hiking Boots
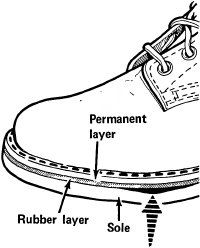
Boots with sewn soles have three layers of sole material. Pry off the outside layer and, if necessary, the middle rubber layer.
Replacing the soles on hiking or work boots is a challenging and money-saving home project. Here's what you'll need for this project.
Tools: small screwdriver or nail puller, sharp knife, sewing awl, work gloves, hammer, scrap wood boards, sturdy cord or clamps, small wood blocks.
Advertisement
Materials: rags, acetone, replacement rubber insoles, heavy-duty waxed thread, coarse sandpaper, replacement Vibram soles; flexible, waterproof shoe-repair adhesive; replacement heel fasteners. Buy Vibram soles of the correct size from a recreational outfitter; buy flexible shoe-repair adhesive and heel fasteners at a shoe repair shop.
Time: about 1 to 2 hours.
Before you can replace the old soles, you must remove them. Normally, boot-soles are either sewn or glued. If they're sewn, there will be threads visible around the upper edge of the sole. Examine the soles for attaching screws or nails in the heel; remove any fasteners with a screwdriver or a nail puller, and save them to attach the new soles.
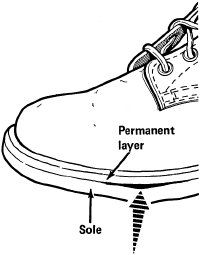
After removing the heel fasteners, separate the old soles from the rest of the boot. If the boots are sewn, you'll find three layers of material: the old sole, a middle rubber layer, and a permanently attached leather layer. To separate the old soles from your boots, insert the blade of a sharp knife between the sole and the middle rubber layer; carefully work it around the boot until the sole is free. If the boots are glued, there will be only two layers, the old sole and a permanent layer. Separate these in the same manner.
Glued soles are attached directly to the permanent layer. Pry off only the outside sole layer.
Once you've removed the old soles, clean the middle rubber layer with acetone until all excess glue and debris are gone. On sewn shoes, check the sewing for breaks, and check the rubber layer for tears. If this rubber layer is torn, it must be replaced too. Remove the damaged rubber layer the same way you removed the sole, inserting the blade of a sharp knife between the rubber layer and the permanently attached leather layer. Mend breaks in the stitching or attach a new middle layer with a sewing awl and heavy-duty waxed thread, making stitches all around the new insole.
After you're satisfied with the soundness and cleanliness of this surface, use coarse sandpaper to roughen both the inside surface and the bonding surface of the new Vibram soles. Wear work gloves, and wipe off any sanding debris thoroughly. Be careful not to touch either the insole or the sole -- body oils repel most adhesives.
Apply flexible shoe-repair adhesive evenly to both surfaces; be especially liberal around the edges. Follow the manufacturer's instructions exactly; join the soles immediately or let the adhesive get tacky before bonding as specified. Align the new sole over the prepared boot surface and press it into place, starting at the toe and working down toward the heel; curl the new sole into place and stretch it toward the heel as you go.
Finally, set the boot on a flat surface, sole up, and pound the entire sole vigorously with a hammer. To assure a good bond, tie or clamp each boot between two flat boards for 24 hours; place a small wedge under the sole just forward of the heel.
When the new soles are dry, trim off excess sole material with a sharp knife, working slowly and deliberately around each boot to assure a professional finish. Finally, if the new Vibram soles have predrilled holes for heel fasteners, set new heel fasteners into the holes and pound them firmly in.
Before your next camping trip, take advantage of the information provided in this article to ensure that your camping supplies are in good working condition.
For tips on caring for and repairing other types of sports equipment, try the following links:
Learn how to keep your bicycle in top condition, including how to patch a tire, replace a chain or spoke, and tune up the brakes at How to Repair a Bicycle.
How to Maintain a Boat has practical tips for making hull repairs, caring for the outboard motor, and making boat accessories.
If you're a skiier, check out How to Maintain Skis to find out how to extend the life of your skis and ski poles.
How to Maintain Golf Equipment leads you step-by-step through regripping and refinishing a golf club.
Skateboarders can get valuable information on taking care of their boards at How to Maintain a Skateboard.
Advertisement
Cite This!
Please copy/paste the following text to properly cite this HowStuffWorks.com article: