Bicycle repair may not be as hard as you might think. 10000 Hours / Getty Images
It's a beautiful day, and you've decided to take a long, peaceful bike ride. You're happily pedaling along when it happens -- your tire is flat. Or maybe your bike's chain breaks. Instead of lugging your bike to the repair shop for a costly visit, fix it yourself using the directions in this article.
We'll cover how to fix a flat, repair a broken chain, replace a chain altogether, and fix or replace a spoke. For each repair, we'll give how-to specifics, helpful illustrations, and a list of the materials and tools you'll need to get the job done. We'll also cover how to tune up your bike's brakes.
Advertisement
Let's start with something most bicyclists have experienced -- a flat tire. Continue to the next section for the lowdown on this repair.
For tips on caring for and repairing other types of sports equipment, try the following links:
Learn how to keep your skis and ski poles in top condition at How to Maintain Skis.
How to Maintain a Boat has practical tips for making hull repairs, caring for the outboard motor, and making boat accessories.
To give you access to the damaged tire, remove the wheel from the bike.
With an adjustable wrench, loosen the nuts that hold the wheel in place. For the rear tire of a single-, 3-, or 5-speed bike, remove the break band attached to the lower frame of the bike; unscrew the screw that holds the metal band and remove the band. Remove the wheel from the bike frame.
Carefully examine the wheel for nails, glass, or other sharp objects; pry out any sharp object wedged into the tread, and mark the damaged spot with chalk. Then remove the tire from the wheel. Pry the tire off by hand, if possible; press firmly with your thumbs to work the tire over the rim. If you can't remove the tire by hand, use bike tire irons. Don't try to use screwdrivers or any other sharp-bladed tool; you could damage your tires.
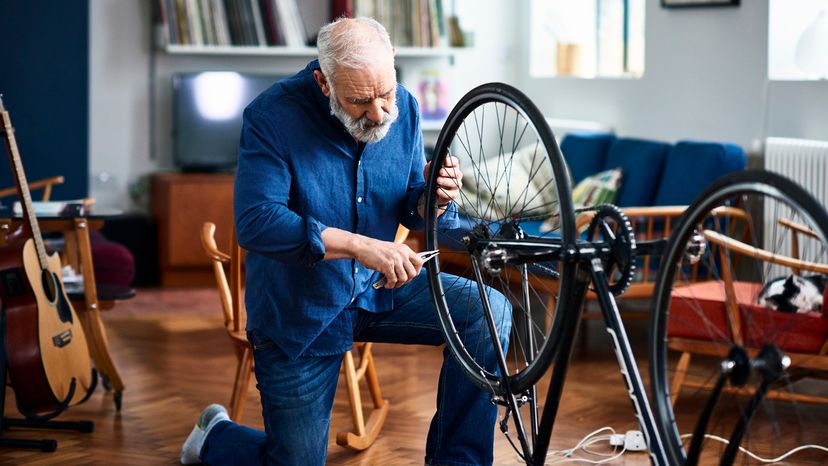
Starting at a spoke, insert the plain end of a tire iron carefully between the rim and the tire; make sure it's firmly held by the edge of the tire. Keeping that end of the tire iron in place, pull the slotted end down and behind the spoke, and hook the slot over the spoke to hold the tire iron firmly in place. Insert a second tire iron at the next spoke and repeat to pry more of the tire off the rim. Repeat, moving tire irons alternately around the rim, until you can work the tire off the rim by hand. Then carefully remove the tube from the tire, pushing the tube valve through the hole in the wheel rim and pulling the tube gently free of the wheel.
Use a bicycle pump to fill the tube until it's firm. Then, with a bucket of water, look for the leak in the tube. Hold a section of the inflated tube underwater and watch for air bubbles; turn the tube in the water until you locate the leak. Check the entire tube; there may be more than one leak. Remove the tube from the water, wipe it dry, and mark the bad spots with chalk.
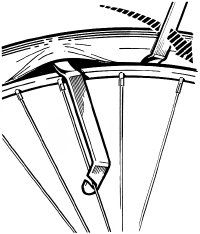
Bike tire patch kits usually include a roughing device. With the roughing device or the top of the kit, scrape the damaged area of the tube to clean it and provide a rough surface for the patch to bond to. Apply a coat of adhesive to the scraped area of the tube, as directed by the instructions in the patch kit. Let the adhesive dry as directed.
Scrape the damaged area with the roughing device; then apply adhesive and press on the patch.
Choose a patch of the appropriate size and peel off its protective backing; press it smoothly and carefully into place over the glued area. Press firmly to seal the patch in place, making sure the edges are entirely bonded. Let the patch dry for 5 minutes and then sprinkle it with talcum powder so it won't adhere to the inside of the tire.
Check the tire once more, inside and out, to be sure nothing sharp is still wedged in it; remove anything stuck in the rubber. Press the uninflated tube into place inside the tire. Carefully insert the valve stem of the tube into the hole in the rim, and push the tire into place over the rim with your thumbs. When it gets too hard to replace the tire by hand, carefully insert the plain end of a tire iron under the tire and pry the tire into place around the rim. Work gently, being careful not to pinch the tube between the tire and the rim or the rim and the tire iron. Use the tire irons only when necessary.
Finally, with the tire in place, inflate it to the correct pressure with the bicycle pump, as marked on the side of the tire. Wait a few minutes to make sure the tire is holding air; then replace the wheel in the bike frame and tighten the nuts that hold it in place. If necessary, replace the break band.
Tires aren't the only part of a bike that take a pounding. Bike chains often become damaged, too. We'll cover how to care for, clean, and replace a bike chain next.
For tips on caring for and repairing other types of sports equipment, try the following links:
Learn how to keep your skis and ski poles in top condition at How to Maintain Skis.
How to Maintain a Boat has practical tips for making hull repairs, caring for the outboard motor, and making boat accessories.
How to Maintain Golf Equipment leads you step-by-step through regripping and refinishing a golf club.
Skateboarders can get valuable information on taking care of their boards at How to Maintain a Skateboard.
Advertisement
How to Clean and Replace a Bicycle Chain
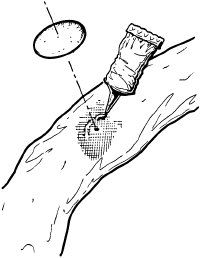
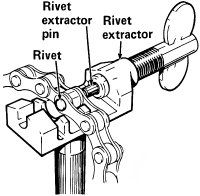
To open a 1/8-inch chain's master link, pull out the retaining clip and remove the straight side plate.
Exposed to dirt and constant stress, a bike chain takes a licking. Give it a checkup every season to keep it working smoothly.
Tools: needle-nose pliers or chain rivet extractor, shallow pan, small stiff brush or toothbrush, chalk.
Advertisement
Materials: kerosene, motor oil, rags, replacement master link or replacement 1/8-inch or 3/32-inch bicycle chain.
Time: about 1/2 to 1 hour, plus drying time.
Cleaning
Single-speed and 3-speed bikes use a 1/8-inch chain with a master link; 5-speeds and 10-speeds use a 3/32-inch continuous chain. Both types should be cleaned regularly. Examine the way the chain is installed on the bicycle, and sketch it if you aren't sure you can remember it. You must replace the chain exactly the same way after you clean it.
Remove the chain from the bicycle. The master link of a 1/8-inch chain has straight side plates. To open the master link, pull out the retaining clip with a needle-nose pliers; then remove the side plate. Pull the link out of the chain to release the ends. To remove a 3/32-inch chain, push out a chain pin rivet anywhere along the chain. Align a chain rivet extractor with its screw pin over a rivet; tighten the screw of the extractor just enough to push the rivet through the center of the chain but leave it hanging from the far side. The chain will separate as the rivet is loosened.
Immerse the chain in kerosene in a shallow pan. Scrub it firmly with a small stiff brush or toothbrush to remove all dirt and old oil, and hang it to dry for about 1 hour. Immerse the cleaned chain in motor oil, remove it, and wipe off the excess oil with rags. Let the chain dry until it stops dripping.
To reinstall the chain, replace it around the rear sprocket and the front chainwheel, exactly as it was before you removed it. Reattach the master link to the loose ends of a 1/8-inch chain; replace the side plate and the retaining clip. Rejoin the ends of a 3/32-inch chain with a chain rivet extractor; loosen the screw pin, align the pin over the loose rivet where the ends of the chain meet, and tighten the screw pin. Adjust the rivet carefully so that it's exactly flush with both sides of the chain.
Check the chain tension to be sure it's correct; the wrong tension can be dangerous. On a derailleur bike, chain tension is adjusted automatically; if you think the tension is wrong, take the bike in to a shop. Single-speed bikes and 3-speed bikes with gears in the hub can be manually adjusted.
Open a 3/32-iinch chain at any link; push out a chain pin rivet with the pin of a chain rivet extractor.
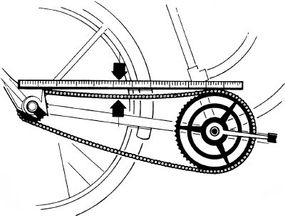
Set a yardstick flat across the tops of the rear sprocket and the chainwheel. At the midpoint of the chain between the two sprockets, the top length of chain should sag about 1/2 inch below the bottom of the yardstick. Adjust the chain tension as necessary. Loosen the nuts on the rear wheel axle and move the wheel forward or back until the sag is correct; then tighten the axle nuts.
Damaged or Broken Chains
If a 1/8-inch chain comes apart at the master link, replace the master link with a new one. Adjust the chain to position it correctly, hook the new master link through the loose ends, and fasten the link. A chain that is damaged or breaks in the middle, or a damaged or broken 3/32-inch chain, should be replaced. Remove the chain as above and take it with you to the bike shop; buy a new chain of the same type.
To fit a new chain to the bicycle, remove links as necessary to adjust the chain to the proper length. If the old chain is in one piece, measure the new chain to this length and mark it with chalk. If you can't measure by the old chain, check chain length by stretching the chain into place around the rear sprocket and the front chainwheel, exactly as the old chain was installed, with the two ends meeting at the front chainwheel. Adjust the chain to the proper tension as above and slip the ends onto the sprockets of the wheel to mate them exactly; mark the exact link where the end link on one side meets the other side of the chain.
Remove any excess links from the end of the new chain with a chain rivet extractor. Replace the chain around the rear sprocket and the front chainwheel and join the ends with the master link or the chain rivet extractor. Be sure the connecting rivet is flush with both sides of the new chain.
Check chain tension by setting a yardstick flat across the sprocket and chainwheel; at its midpoint, the top length of chain should sag 1/2 inch below the yardstick. Adjust the chain as necessary to this tension.
Broken spokes are another bike part you may need to replace from time to time. Learn how to make this easy repair on the next page.
For tips on caring for and repairing other types of sports equipment, try the following links:
Learn how to keep your skis and ski poles in top condition at How to Maintain Skis.
How to Maintain a Boat has practical tips for making hull repairs, caring for the outboard motor, and making boat accessories.
Set the bicycle upside down and prop it firmly in place. Using an adjustable wrench, loosen the nuts that hold the wheel in place; remove the wheel. Let the air out of the tire. Remove the tire from the wheel by hand, if possible; or use tire irons to work the tire over the rim. Starting at a spoke, carefully insert the plain end of a tire iron between the rim and the tire. Holding that end in place, pull the slotted end down and behind the spoke, and hook the slot over the spoke. Insert a second tire iron at the next spoke; repeat, moving the irons alternately around the rim, until you can work the tire off by hand. Then remove both tire and tube.
Once the tire has been removed, you're ready to replace the damaged spoke. On most bikes, the heads of the nipples that hold the wheel spokes in place are covered by a large rubber band. Pull this band over the rim and remove it. If the broken spoke has fallen out of the wheel, examine the wheel to find the empty hole where the new spoke will go. If the old spoke is still in the wheel, cut it off at both ends with wire cutters. Remove any pieces of old spoke left in the wheel rim or the hub.
The new spoke must be exactly the same length and diameter as the old one. To make sure you get the right size, either take the whole wheel to the bike shop or remove a good spoke from the same side to measure by. Don't accept any differences in either length or diameter.
To make the repair, insert the head of the spoke, the end that doesn't have a nipple, into the empty hole in the hub. The spoke head should curve away from the hub. You may have to bend the spoke slightly to get it into place, but don't bend it sharply.
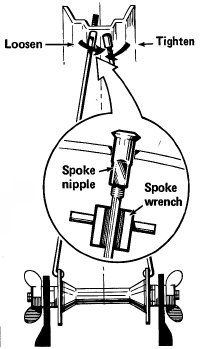
When the spoke is in place, insert the nipple through the hole in the wheel rim and thread it carefully onto the end of the spoke. Hand-tighten the nipple; don't use the spoke wrench yet.
Tighten or loosen the new spoke to align the wheel properly; it should spin freely and evenly.
Replace the wheel rim in the fork of the bicycle frame; tighten the wheel nuts. Spin the rim firmly with your hand. As it spins, sight directly down the wheel to see if the spin is even. The wheel will probably be warped away from the side where the new spoke was installed. Stop the wheel and tighten the new spoke a little with the spoke wrench, then respin the wheel and check the wheel alignment again.
Repeat, tightening the new spoke nipple, until the wheel spins freely and evenly. If the wobble persists after you've tightened the new spoke nipple two or three full turns, loosen the spokes opposite the new spoke to correct the alignment.
After you've aligned the tire, check the new spoke to make sure it doesn't stick out through the rim end of the nipple. If necessary, file it flat. Finally, replace the rubber band over the spoke nipples, replace the tube and tire, and pump the tire full.
While riding a bike with a broken spoke isn't dangerous, riding a bike with unreliable brakes is. Keep your brakes in tip-top shape by tuning them up regularly. See the next page for how-to tips.
For tips on caring for and repairing other types of sports equipment, try the following links:
Learn how to keep your skis and ski poles in top condition at How to Maintain Skis.
How to Maintain a Boat has practical tips for making hull repairs, caring for the outboard motor, and making boat accessories.
How to Maintain Golf Equipment leads you step-by-step through regripping and refinishing a golf club.
Skateboarders can get valuable information on taking care of their boards at How to Maintain a Skateboard.
Advertisement
How to Tune Up Bicycle Brakes
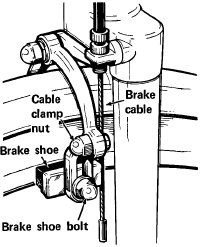
Side-pull brakes are secured by a cable clamp nut; loosen the nut and pull the cable through the clamp.
The caliper brakes on 3-speed, 5-speed, and 10-speed bikes are easy to adjust when they don't perform properly. To do this adjustment yourself, here's what you'll need.
Tools: third hand, adjustable wrench, pliers.
Advertisement
Materials: bicycle spray lubricant, replacement rubber brake pads or shoes.
Time: about 1/2 hour.
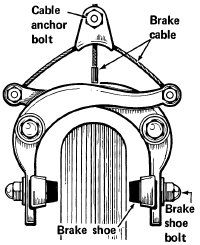
Inadequate braking is often the result of a loose brake cable on one or both bike wheels. Place a third hand -- a special tool available at bike shops -- over the brake shoes; use it to draw the brake shoes into contact with the wheel rim.
With an adjustable wrench, loosen the cable clamp nut that secures side-pull brakes or the cable anchor bolt that secures center-pull brakes. Grip the end of the cable with pliers and pull the cable through the clamp or anchor until it's tight; holding the cable tight with one hand, tighten the cable clamp nut or cable anchor. Release the brake.
Test the brake by squeezing the brake lever; the brake should grip when the lever is depressed about 1/2 inch. If it doesn't, the cable could still be too loose; repeat the tightening procedure. Lift the bike so that its front wheel is off the ground, and spin the wheel. If the wheel binds, loosen the cable a bit.
Center-pull brakes are held by an anchor bolt; tighten the cable by pulling it through the anchor.
Follow the same procedure to tighten the brake cable on the back wheel of the bike. Test the brake by squeezing the brake lever and spinning the wheel; adjust cable tension as necessary.
Finally, after you adjust the brake cable tension, check the brake levers on the handlebars. If they're stiff or squeaky, spray them with bicycle spray lubricant at the pivot points.
If the brake cables are tight, faulty braking can result from wear to the brake shoes, the blocks of rubber that press against the wheel rims when the brake levers are squeezed. Examine the rubber brake shoes carefully. The rubber should be flexible; if a shoe is hardened or cracked, or if it's less than 1/2 inch thick above the metal mounting plate, it must be replaced. Buy four new brake shoes of the same type; take an old one with you to the bike shop to make sure you get the right type. Change all four old shoes.
To replace the brake shoes, use an adjustable wrench to remove the bolts that hold them into the slots in the U-shaped brake arms on each wheel. Take out the old brake shoes. Set the new shoes into place in the adjustment slots, aligned the same way the old ones were. The shoes must rub only the rim of the wheel when the brake is applied; be careful to position them correctly. Replace the bolts over the brake shoes and tighten them with a wrench.
Keeping your bicycle in good condition allows you to spend more time riding and less time repairing. Use the advice in this article to make the most of your biking adventures.
For tips on caring for and repairing other types of sports equipment, try the following links:
Learn how to keep your skis and ski poles in top condition at How to Maintain Skis.
How to Maintain a Boat has practical tips for making hull repairs, caring for the outboard motor, and making boat accessories.