Sailing Image Gallery Yachts Jupiter, Vampire and Jongleur race downwind. See more pictures of sailing.
Getty Images
You've invested a good chunk of money in your boat, and you want it to last forever. The elements can do a number on your prized watercraft, so proper care and prompt repairs are essential. In this article, we'll cover important boat repairs and maintenance, including how to patch a fiberglass hull and how to tune up -- and winterize -- an outboard motor.
We'll also teach you how to make a protective cover for your boat out of heavy plastic. Finally, we'll give you the how-tos for making waterproof cushions for your cockpit so you can whiz around the water in comfort.
Advertisement
Patching a fiberglass hull is first on our list.
Continue to the next page for the details.
For tips on caring for and repairing other types of sports equipment, try the following links:
Learn how to keep your skis and ski poles in top condition at How to Maintain Skis.
For maintenance tips for your bicycle, including how to patch a tire, replace a chain or spoke, and tune up the brakes, read How to Repair a Bicycle.
If you're a camper, check out How to Make and Repair Camping Equipment to learn how to fix a damaged tent, make a tarp, and more.
How to Maintain Golf Equipment leads you step-by-step through regripping and refinishing a golf club.
Skateboarders can get valuable information on taking care of their boards at How to Maintain a Skateboard.
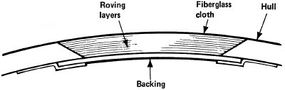
Brush the first patch of roving with resin and set it into the prepared hole against the cardboard backing; press it smoothly into place with the brush, stroking lightly from the center toward the edges.
A holed fiberglass sailboat or canoe looks bad, but unless the boat is structurally damaged, it's easy to repair. With patience, you can rebuild the hull as good as new.
Tools: disc sander or electric drill with sanding disc, buffing attachment for sander or drill, scissors, mixing can and stir stick, paintbrushes, sanding block.
Advertisement
Materials: medium-grit sanding discs, soft cloths, acetone, light cardboard, plastic wrap, masking tape; quart-size polyester resin fiberglass repair kit, or polyester resin and hardener, 10-ounce roving, and 7 1/2-ounce fiberglass cloth; fine, very fine, and extra-fine wet-or-dry sandpaper; gel coat to match hull, fiberglass rubbing compound, car wax.
Time: about 2 days, depending on size of hole.
To patch the hole, buy a quart-size polyester resin fiberglass repair kit at a marine store; from the boat's manufacturer, buy gel coat to match the color of your boat. If you can't find a repair Kit buy 1 quart of polyester resin and hardener, and 2 square feet each of 10-ounce roving and 7 1/2-ounce fiberglass cloth. Buy fiberglass rubbing compound to finish the repair.
To prepare a firm base for the patch, enlarge the hole. Grind down the edges of the hole to firm fiberglass with a disc sander or an electric drill with a sanding attachment, and a medium-grit sanding disc. When you've exposed sound fiberglass all around the hole, taper the ground hole out into the sound hull, so that the outside edge of the hole is at least 2 or 3 inches wider than the inside edge. This provides a firm bonding surface for the patching material.
When the hole is completely sanded, wipe the dust off with a soft cloth and then clean the damaged area with a cloth soaked in acetone. Caution: Acetone is extremely flammable. Work in a well-ventilated area, and don't smoke; dispose of acetone-saturated cloths immediately in an outside vented container.
To contour the patch to match the shape of the hull, cut a backing piece from light cardboard. Cut the cardboard at least 2 inches larger than the hole all around. Cover the piece of cardboard smoothly with plastic wrap, taped into place, so that the patch won't stick to it, and then set the backing into place on the inside of the hull; it should cover the hole completely. Carefully bend the cardboard to match the curve of the hull, and tape it firmly into place with masking tape. The curve of the cardboard must match the hull contour precisely or the patch will be weak.
When the hole is backed, prepare the patching material. The hole will be filled with pieces of 10-ounce roving to the thickness of the hull; the top layer is cut from 7 1/2-ounce fiberglass cloth to match the hull surface.
Cut the first layer of roving to fit the inside diameter of the hole, at its smallest point. Cut successive layers slightly larger, to overlap the inside layers and feather out over the tapering edges of the hole. Stack the layers of roving in the hole as you cut them so you can see how many thicknesses to cut. When you have enough layers of roving to make the depression just level with the surrounding hull surface, cut a piece of fiberglass cloth to complete the patch, overlapping well onto the sound hull surface.
Lay the pieces of roving and fiberglass out in order on a clean surface near the boat. Then, with your patching material at hand, mix polyester resin and hardener in a can as directed by the manufacturer. Mix only as much resin as you can apply in less than 1/2 hour; it hardens quickly. Make sure the temperature in your work area is at least 60° F.
Set the first patch of roving -- the smallest one -- on a clean piece of cardboard near the boat. Working quickly, apply catalyzed resin to the roving with a small paintbrush; brush the resin well into the roving to soak it thoroughly. The roving should be completely wet through, but not dripping. Pick up the piece of wet roving and set it into the prepared hole in the hull, centered in the bottom of the depression. Press it smoothly into place with the brush, dabbing it from the center toward the edges.
Set the next smallest patch of roving on the cardboard and apply catalyzed resin to it as above; soak it thoroughly. Position the saturated roving over the first layer in the hole, and smooth it into place with the brush. Repeat, applying resin and smoothing each roving layer into place, to build up a smoothly graduated patch of new material in the hole, tapering with the edges of the hole to match the contour of the hull.
Build up layers of roving to fill the hole completely, soaking each layer with resin and smoothing it down. Complete the patch with a layer of fiberglass cloth, applied dry and brushed well down.
When all the layers of roving have been applied, close the patch with the prepared piece of fiberglass cloth. Instead of soaking the cloth with resin, set it directly over the patch, dry, and work it down into the resin-soaked roving with the paintbrush. If necessary, add a small amount of additional resin to saturate the edges of the fiberglass cloth, but be sparing; too much resin will weaken the patch. Use only enough resin to thoroughly wet and darken all the roving and cloth.
Let the completed patch dry for at least 8 hours, as specified by the resin manufacturer. When the patch is completely dry, remove the cardboard backing from the inside of the hull; the patch should follow the contour of the hull exactly. Remove any irregularities in the patch surface, and correct contour as necessary, with a disc sander or an electric drill with a sanding attachment, and a medium-grit sanding disc; do not oversand, but smooth the area to match the hull contour exactly. Then smooth the sanded surface by hand with a sanding block and fine-grit wet-or-dry sandpaper, using long back-and-forth strokes over the patch.
When the patch is smooth and matches the hull contour, clean the area with acetone to remove all dust. Finish the patch with gel coat, to match the color of the hull. Mix the gel coat as directed by the manufacturer. Brush a thin layer of gel coat onto the patch area, to cover the patch completely and evenly. Then, working quickly, carefully smooth a large piece of plastic wrap directly over the wet gel coat, smoothing out all air bubbles and wrinkles, to cover the patch completely. If necessary, use overlapping strips of plastic to cover the patch completely. You must cover the gel coat with plastic or it won't dry smooth.
Let the gel coat dry for at least 8 hours, as directed by the manufacturer. When the gel coat is completely dry, peel off the plastic wrap; the patch surface should be very smooth. Carefully hand-sand the patch area with fine-grit wet-or-dry sandpaper to remove any excess gel coat and contour the patch to match the hull exactly. Smooth the sanded patch carefully and remove any scratches with very fine and then extra-fine wet-or-dry sandpaper; use enough water to prevent scratching the gel coat.
Finally, clean the rebuilt hull area thoroughly with a wet cloth. To polish the patch, apply fiberglass rubbing compound to the sanded gel coat and buff the surface as directed by the manufacturer; use the buffing attachment of the disc sander or electric drill. After buffing the patch, apply a protective coat of car wax to the hull surface.
Now that your boat's hull is patched and buffed, let's turn our attention to the interior of the boat. Learn how to make built-in waterproof cockpit cushions on the next page.
For tips on caring for and repairing other types of sports equipment, try the following links:
Learn how to keep your skis and ski poles in top condition at How to Maintain Skis.
For maintenance tips for your bicycle, including how to patch a tire, replace a chain or spoke, and tune up the brakes, read How to Repair a Bicycle.
If you're a camper, check out How to Make and Repair Camping Equipment to learn how to fix a damaged tent, make a tarp, and more.
How to Maintain Golf Equipment leads you step-by-step through regripping and refinishing a golf club.
Skateboarders can get valuable information on taking care of their boards at How to Maintain a Skateboard.
Advertisement
How to Make Custom Dry Cockpit Cushions
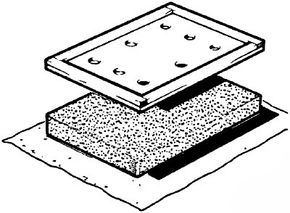
Each cushion is assembled over a plywood base, framed and vented; vinyl covers the closed-cell foam.
Few things are more annoying than sitting on an unexpectedly soggy cushion, and boat cockpit cushions are particular offenders. Solve the problem permanently with waterproof, ventilated built-ins.
Tools: measuring rule or tape, power saw or handsaw, carpenters' square, hammer, electric drill or brace and bit, paintbrush, sharp utility knife, sharp scissors, staple gun.
Time: about 4 hours per cushion, plus drying time.
Choose the materials for your cushions carefully; everything you use must be waterproof and noncorroding. Be sure to buy closed-cell foam -- the open-cell kind absorbs water.
For each cushion you're replacing, measure the old cushion carefully. Plan the frame of the cushion to be 1 inch smaller than the cushion each way, and measure and cut a piece of 3/8-inch exterior plywood exactly to that size; use a carpenters' square to make sure your cuts are straight.
Cut four pieces of 1/2 × 3/4-inch parting stop stock to form the sides of the frame, with two pieces the same length as the sides of the plywood square and two pieces cut short enough to butt between the other pieces at the corners of the boat cushion frame. Nail the strips of parting stop into place on the sides of the plywood to form a shallow tray; use 5/8-inch brads to attach the strips to each other at the corners and to the plywood backing of the frame.
When the frame of the cushion is assembled, drill four to eight 1/4- to 1/2-inch ventilation holes in the plywood base, depending on the size of the frame. Use an electric drill or a brace and bit. Varnish the completed frame thoroughly with high-gloss polyurethane varnish, covering the wood generously to prevent it from delaminating. Varnish the plywood base on the edges and both sides, being careful to cover the insides of the drilled ventilation holes; varnish all exposed surfaces of the parting stop frame. Let the frame dry completely, as directed by the manufacturer, and apply a second generous coat of varnish; let dry again.
For each cushion, measure and cut 4-inch-thick heavy-duty closed-cell foam exactly to size with a sharp utility knife. The foam should be 1 inch larger than the plywood frame each way. Using the foam as a pattern, cut a piece of waterproof fabric or vinyl about 7 inches longer than the foam all around, so that it can be folded over the foam toward the middle of the cushion and stapled into place. Make sure to leave enough fabric to cover the sides of the frame on all sides.
Spread the fabric on the floor and center the foam on it; then set the plywood base of the cushion on top of the foam, frame side up and flat side to the foam. Starting at one corner, fold the fabric up over the foam and the frame. Turn the cut edge under and staple the fabric into place on the plywood inside the parting stop frame, using a staple gun and copper-clad heavy-duty staples. Pleat the corners of the fabric in to miter them neatly as you work. Repeat to fasten the opposite side of the fabric, pulling it firm but not flattening the foam; then staple the other two sides.
Follow the same procedure for each cushion you're replacing, being careful to make the new cushion's exactly the same size as the old. To install the cushions, just set them in place in the cockpit.
As captain of your boat, you have to make sure all its parts are in working order. Perhaps the most important of these is the outboard motor. In the next section, learn how to poperly inspect, maintain, and tune up your boat's motor.
For tips on caring for and repairing other types of sports equipment, try the following links:
Learn how to keep your skis and ski poles in top condition at How to Maintain Skis.
For maintenance tips for your bicycle, including how to patch a tire, replace a chain or spoke, and tune up the brakes, read How to Repair a Bicycle.
If you're a camper, check out How to Make and Repair Camping Equipment to learn how to fix a damaged tent, make a tarp, and more.
How to Maintain Golf Equipment leads you step-by-step through regripping and refinishing a golf club.
Skateboarders can get valuable information on taking care of their boards at How to Maintain a Skateboard.
Advertisement
How to Tune an Outboard Motor
At least once a year, to extend its life and ensure its reliability, give your outboard motor a tune-up. Follow these general maintenance steps; consult your owner's manual for specific instructions.
Tools: owner's manual, screwdriver, Phillips-head screwdriver, adjustable wrench, pliers, hammer, coffee can or other container.
Advertisement
Materials: soft cloths, lower-unit lubricant, replacement nuts and bolts as required, waterproof marine grease, replacement spark plugs, replacement fuel filter element, car wax, fresh fuel and oil. Buy lubricant, bolts, filters, and marine grease at a marine store.
Time: about 3 hours.
Whatever brand or size outboard you have, use the maintenance schedule outlined in your owner's manual. Follow any specific recommendations and use any special applicable procedures. Use only specified lubricants and replacement parts; if you use different ones you'll void your warranty.
Start your preseason checkout with a visual inspection. With the motor off, remove the cowling to expose the power head. Starting at the propeller, at the bottom of the lower unit, examine the motor for signs of leaking lubricants; look around the propeller and below the fill screws on the side of the gear housing. A little oil is normal, but if there's a dark oil stain running down from the propeller, there could be a leak in the seals behind the propeller. This should be repaired by a qualified outboard mechanic.
A bad propeller wastes fuel and increases wear to the lower unit; examine the propeller carefully. Look for small cracks in the blades near the hub, for large nicks in the blade tips; check to see whether the blades are bent or misaligned. If you find any of these conditions, take the propeller to a propeller specialist or to the dealer; don't try to repair the damage yourself.
If your owner's manual recommends periodic lubricant changes for your motor's lower unit, remove the unit's top and bottom fill plugs and let the lubricant drain into a coffee can or other container. Replace the lubricant with the type recommended for your motor. Insert the lubricant applicator's nozzle into the bottom fill hole and squirt the lubricant into the gear case. When the lubricant starts to come out the top fill hole, replace the top plug; then remove the applicator nozzle and replace the bottom plug. Remove excess lubricant with a soft cloth.
Inspect the lower unit, working upward, for loose or missing nuts or bolts; consult the drawings and follow the precise instructions provided in your owner's manual. Tighten loose screws, nuts, and bolts; replace missing hardware with the exact type recommended for use in your motor.
At the transom clamp bracket, lubricate the grease fittings, as directed in your owner's manual. Lubricate the swivel bracket -- the bearing the motor turns on -- with the waterproof marine grease recommended for your motor; then lubricate the transom clamp screw threads with the same grease.
Work the throttle control on the engine; twist the hand throttle or move the control lever the throttle control cable is attached to. As you work the throttle control, watch the motor to identify moving parts inside the power head. Lubricate all moving parts with the waterproof marine grease recommended for your motor. Move the forward-reverse shift lever and watch for movement inside the motor; lubricate all pivot points. Then gently pull the starter cord and watch the starter pinion gear that engages the flywheel at the top of the motor; lubricate the gear and the bearing inside.
After lubricating moving parts inside the power head, disconnect the spark plug wires. Be careful to note their location exactly so you'll be able to replace them correctly. Using an adjustable wrench, remove each spark plug and replace it with a new one of the correct type for your motor; first hand-tighten and then wrench-tighten each plug. Be careful not to overtighten the plugs; excessive pressure could damage the aluminum cylinder head.
At least once a year, to ensure smooth running, replace the motor's fuel filter; use a new filter of the type recommended for your motor. The fuel filter is usually located inside the motor's cover at the engine end of the fuel pump, or incorporated into the fuel pump; check your owner's manual and follow the manufacturer's instructions. Clean out any accumulated water and sediment, and replace the filter element with a new one of the correct type.
Replace the cowling on the engine. To protect the finish and prevent corrosion, apply a coat of car wax to the cowling, as directed by the manufacturer. Then mix fuel for the motor, using the proportions of fresh fuel and oil specified in your owner's manual. Mount the motor, in water for testing.
Finally, with the motor mounted, start the engine. Immediately check for a flow of water somewhere at the rear of the engine; this indicates that the water pump is functioning properly. Let the engine warm up for at least 2 minutes and then adjust the low-speed carburetor jet, turning the fuel-mix knob on the front of the motor until the motor idles smoothly. Put the motor into gear and go for a short ride; then idle down and readjust. If your motor has an idle adjustment, turn the control until the engine idles smoothly and doesn't die when you shift into gear.
By performing this periodic maintenance, you can keep your boat's outboard motor in good working condition. Next, we'll describe specific steps to prepare the outboard motor for storage over the winter.
For tips on caring for and repairing other types of sports equipment, try the following links:
Learn how to keep your skis and ski poles in top condition at How to Maintain Skis.
For maintenance tips for your bicycle, including how to patch a tire, replace a chain or spoke, and tune up the brakes, read How to Repair a Bicycle.
If you're a camper, check out How to Make and Repair Camping Equipment to learn how to fix a damaged tent, make a tarp, and more.
How to Maintain Golf Equipment leads you step-by-step through regripping and refinishing a golf club.
Skateboarders can get valuable information on taking care of their boards at How to Maintain a Skateboard.
Advertisement
How to Winterize an Outboard Motor
To keep your outboard motor in top shape from year to year, prepare it carefully for winter storage.
Tools: owner's manual, freshwater flushing unit, garden hose, screwdriver, adjustable wrench, coffee can or other container, tarp, piece of scrap wood.
Advertisement
Materials: fuel conditioner, rust-preventive oil, lower-unit lubricant, soft cloths, replacement nuts and bolts as required, touch-up paint, car wax. Buy lubricant, oil, and fuel conditioner at a marine store.
Time: about 2 hours.
Whatever brand or size outboard motor you have, follow the specific recommendations and instructions given in your owner's manual. Use only specified lubricants and replacement parts; if you use different ones you'll void your warranty.
If you operate your motor in salt water, it must be thoroughly flushed to prevent corrosion. To flush the motor, use a freshwater flushing unit made to fit your motor. Attach the unit's fitting to the motor's cooling system as directed by the manufacturer; attach the coupling at the other end of the unit to a garden hose. Run the motor for several minutes at less than half throttle, exactly as directed, to remove all salt from the motor.
Whether you operate the motor in salt water or in fresh, you must protect it from corrosion. The last time you use the motor before storing it, add to the fuel tank 1 ounce of fuel conditioner for each gallon of fuel in the tank. Operate the motor for about 5 minutes to make sure the fuel conditioner has reached the carburetor. Then disconnect the fuel line or turn off the fuel, and squirt a liberal amount of rust-preventive oil into the air intake of the carburetor; use the type of oil recommended by your motor's manufacturer. The engine should sputter, smoke, and die. If it doesn't, squirt in more oil; then shut the motor off and shift it into neutral gear. Dismount the motor and let it cool.
With the motor disconnected, drain the fuel from the carburetor. Remove the cowling and disconnect the spark plug wires; be careful to note their location exactly so you'll be able to replace them correctly. Using an adjustable wrench, remove the spark plugs. Inject about 1 ounce of rust-preventive oil into each cylinder, and slowly crank the flywheel on the top of the motor to spread the oil over the entire cylinder surface. Then replace and hand-tighten the spark plugs; leave the ignition wires disconnected.
If your owner's manual recommends periodic lubricant changes for your motor's lower unit, remove the unit's top and bottom fill plugs and let the lubricant drain into a coffee can or other container. Replace the lubricant with the type recommended for your motor. Insert the lubricant applicator's nozzle into the bottom fill hole and squirt the lubricant into the gear case. When the lubricant starts to come out the top fill hole, replace the top plug; then remove the applicator nozzle and replace the bottom plug. Remove excess lubricant with a soft cloth.
Inspect the lower unit for loose or missing nuts or bolts; consult the drawings and follow the precise instructions provided in your owner's manual. Tighten loose screws, nuts, and bolts; replace missing hardware with the exact type recommended for use in your motor.
After lubricating and inspecting the motor, soak a soft cloth in rust-preventive oil and squeeze it out. Rub the cloth over all exposed parts of the motor to coat them with oil and prevent corrosion. Then replace the cowling.
Inspect the cowling for chipped or peeling paint; touch up bad spots with matching paint. Use a touch-up kit made for your motor, or any good enamel; follow the manufacturer's instructions for application and drying. When the motor is completely dry, apply a coat of car wax to the cowling, as directed by the manufacturer. For further protection, rub the cowling with an oil-soaked cloth to coat it lightly with oil.
Store the motor in a dry, dust-free place; cover it with a tarp to protect it from dirt. If the motor has a battery, remove the battery and store it separately; set it off the floor on a piece of scrap wood. Make sure the case is clean and the water in the cell is at the correct level.
During the winter, work the throttle control every few weeks to keep the moving parts from corroding; twist the hand throttle or move the control lever the throttle control cable is attached to. Gently pull the starter cord to engage the gears. If the motor has a battery, check the water level in the cell and add water as necessary to maintain the charge.
Storing your boat in an enclosed area is the best way to protect it from the elements. If you store your boat outside, a well-made cover can keep your boat from aging prematurely. Find out how to make a protective boat cover in the next section.
For tips on caring for and repairing other types of sports equipment, try the following links:
Learn how to keep your skis and ski poles in top condition at How to Maintain Skis.
For maintenance tips for your bicycle, including how to patch a tire, replace a chain or spoke, and tune up the brakes, read How to Repair a Bicycle.
If you're a camper, check out How to Make and Repair Camping Equipment to learn how to fix a damaged tent, make a tarp, and more.
How to Maintain Golf Equipment leads you step-by-step through regripping and refinishing a golf club.
Skateboarders can get valuable information on taking care of their boards at How to Maintain a Skateboard.
Advertisement
How to Build a Boat Cover
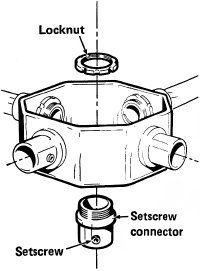
Octagonal electrical boxes hold the frame together; insert setscrew connectors and tighten the locknuts.
Enclosed boat storage is expensive, but an unprotected boat ages quickly. Store your boat in your own yard with this lightweight, easily disassembled cover frame.
Materials: 3 1/2-inch octagonal electrical boxes, 1/2-inch or 3/4-inch thinwall setscrew connectors, 1/2-inch or 3/4-inch thinwall electrical conduit, scrap wood blocks, scrap pieces of carpeting, heavy-duty staples, heavy plastic tarp, duct tape, sturdy cord.
Time: about 6 to 8 hours.
To calculate the materials you'll need, figure from the length of your boat. Divide the length of the boat by 3 and add 1; this is the number of 3 1/2-inch octagonal electrical boxes you'll need. Thinwall electrical conduit is sold in 10-foot sections; buy 1/2-inch conduit for small boats and 3/4-inch conduit for wide boats. You'll need sections for the support legs of the cover frame, for the ridgepole, and for snow support posts. Divide the length of the boat by 3 and multiply by 2; this is the number of sections needed for the support legs. Divide the length of the boat by 3; this is the number of ridge sections you'll need. Add 3 to 6 sections for snow support posts at the ridge-leg intersections, depending on how much snow falls in your area. Rent a thinwall conduit bender to simplify the frame assembly; get instructions from the rental agent.
To cover the boat, buy a heavy plastic tarp, at least 5 feet longer than the boat and at least 3 times as wide. Check at outdoor stores or industrial supply houses for the best buy. If possible, choose an opaque black tarp, to speed melting of piled-up snow.
Before you start work, plan the assembly of the cover frame, and sketch your plan so you can refer to it as you work. Space arched cover support legs over the boat at each end of the boat and every 3 feet along its length; connect the supports with a ridgepole. Brace the framework firmly with three to six support posts holding the top of the frame above the boat's deck.
Prepare the electrical boxes by removing the knockout plugs on the sides of the boxes; strike them sharply with the handle of a slip-joint pliers and then twist the tabs off with the jaws of the pliers. Insert a thinwall setscrew connector into each side opening of each junction box and tighten the locknuts firmly with the pliers.
Construct the support legs of the frame first. Insert a section of conduit into the conduit bender and align it with the edge of the bender; then make a 135-degree bend in the pipe -- 45 degrees out from a right angle -- as directed by the rental agent. Repeat to bend each support leg section of conduit. Insert two sections of conduit at the bent ends into the openings on opposite sides of an electrical box, making an angular tent shape; don't tighten the setscrews yet. You'll need an assistant at this point to determine the desired height of the legs.
Hold the assembled but not secured support over the boat, straddling the boat at a center support point so that the angled-out legs touch the edges of the boat. Adjust the support to the desired height over the boat and have your assistant mark the deck intersection point with a scratch awl or grease pencil. Cut the conduit legs at these points with a hacksaw; then reinsert the legs into the electrical boxes and firmly tighten the setscrews to hold them in place.
Repeat this procedure to place and cut each support leg, setting legs at the ends of the boat and every 3 feet along its length. The supports at the center of the boat will be higher than the supports at bow and stern, forming a pitched cover to shed snow and rain. Set each pair of support legs in order as you work so that you'll be able to assemble the frame in sequence.
When all the support legs have been bent and cut, cut 3-foot sections of conduit to form a connecting ridgepole from support leg to support leg. Assemble the conduit frame by connecting the support sections with 3-foot ridge sections; tighten the setscrews holding the connecting sections in place. At this point the frame will be a long tent-shaped skeleton that covers the length and width of the boat exactly.
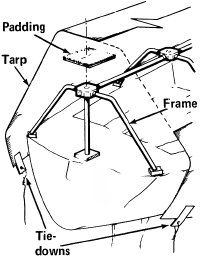
Set the assembled frame onto the boat. To protect the boat, insert a block of scrap wood under each conduit leg. Pad the top corners of the frame and cover the electrical boxes with pieces of scrap carpeting, wrapped around and stapled together with a staple gun and heavy-duty staples.
The completed frame is braced on the deck; tape tie-down tabs hold the plastic cover to the boat trailer.
To complete the framework, add three to six snow support posts, depending on the snow load in your area and the deck or cockpit you're working over. At each support point, where the support legs and the ridge sections are connected at the sides of an electrical box, measure the distance from the bottom of the box to the deck or cockpit directly below it. Cut a section of conduit to the measured distance and connect it to the bottom opening of the box with a setscrew connector, forming an upright brace inside the framework. Set a block of scrap wood under the brace to protect the deck.
With the completed frame in place over the boat, spread a heavy plastic tarp over the frame to cover it entirely. The tarp must extend at least 1 foot past the deck all around; if the boat is any color but white, cover the entire hull, if possible, to prevent fading.
To secure the tarp over the framework, attach a tab of duct tape every 2 to 3 feet around the boat. For each tab, cut a piece of duct tape about 1 foot long. Stick 4 inches of one end of the tape to the outside of the plastic tarp and fold the tape over on itself to stick 4 inches at the other end to the inside, with a double 2-inch-long tab of tape sticking out beyond the edge of the plastic. Cut a small hole in each tab with a scissors or a utility knife.
Attach the tarp to the boat trailer with sturdy cord, cut as needed and looped securely through the duct tape tabs. Be careful to fasten the cover down securely, with no loose or flapping edges; strong wind could damage a poorly secured tarp. Disassemble and reassemble the cover frame as needed each season.
Keeping your boat seaworthy, attractive, and comfortable need not be a worry. Follow this article's advice, and you'll be smooth sailing all the way.
For tips on caring for and repairing other types of sports equipment, try the following links:
Learn how to keep your skis and ski poles in top condition at How to Maintain Skis.
For maintenance tips for your bicycle, including how to patch a tire, replace a chain or spoke, and tune up the brakes, read How to Repair a Bicycle.
If you're a camper, check out How to Make and Repair Camping Equipment to learn how to fix a damaged tent, make a tarp, and more.
How to Maintain Golf Equipment leads you step-by-step through regripping and refinishing a golf club.
Skateboarders can get valuable information on taking care of their boards at How to Maintain a Skateboard.
Advertisement
Cite This!
Please copy/paste the following text to properly cite this HowStuffWorks.com article: