How Ice Climbing Works

By: Debra Ronca
Extreme Sports Image Gallery An ice climber ascends the ice-covered rock face of Hintertux Glacier in Austria. See more pictures of extreme sports.
David Trood/Getty Images

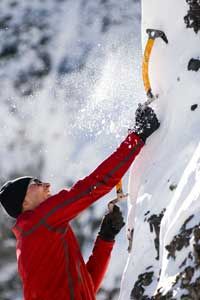
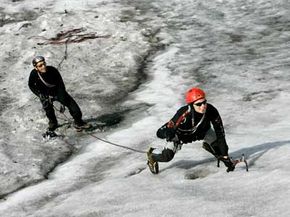
For most people, getting up close and personal with ice means drinking a frosty beverage. The worst that could happen is brain freeze. But adventure junkies will spend hours, days even, with their faces flat against the side of a glacier or frozen waterfall, using picks and ropes to scale its slick, textured and treacherous surface. The thrill of danger -- Will I fall into an icy crevasse? Will I get frostbite? Will an avalanche come out of nowhere? -- is what makes ice climbers so passionate about their sport.

Ice climbing evolved out of rock climbing and other mountaineering activities. In high altitudes, rock climbers had to learn how to navigate icy and slippery areas as they worked their way up a mountain or rock wall. Eventually, climbers began to develop specialized tools and gear to get through those icy spots. Over time, climbers began to seek out strictly ice climbs.

Advertisement

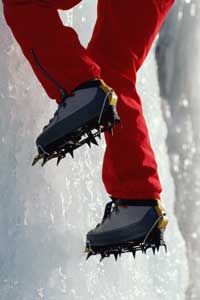
You can trace the birth of ice climbing back to 1908, when a climber named Oscar Eckenstein designed toothed claws, called crampons, that fit into the bottom of his boot. These crampons allowed a climber to gain traction on the slippery ice. Before crampons were invented, ice climbers had to use step cutting, a laborious method of cutting foothold areas into the snow and ice with a pick or axe, to gain footing.

­In the 1930s, climber Laurent Grivel made another significant advance. He added sharp fangs that jutted out in front of the crampons, which allowed climbers to navigate steeper ice. Then, in the 1960s, Yvon Chouinard, who went on to create the Patagonia clothing line, revolutionized the design of ice axes. First, he shortened the traditional 25-inch (63.5 cm) mountaineering axe down to 22 inches (55.8 cm). Next, he changed the shape of the traditional pick, which at that time was straight at a shallow angle to the axe's shaft. This shallow angle was fine for regular snow climbing, but wasn't effective on steeper snow and ice. His curved pick entered the ice more easily and was also easier to remove.

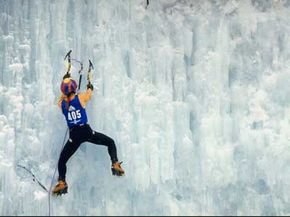
Today, a plethora of tools and safety gear make ice climbing accessible for almost anyone. You can take guided climbing lessons; you can do less strenuous ice climbs in the sun, or take on advanced multi-day steep climbs in sub-zero temperatures. With the right training, just about everybody can ice climb, as long as they're in excellent cardiovascular fitness and have a good strength-to-weight ratio. Experts recommend specific exercises to get your body ready for your first climb, including squats, deadlifts, overhead press, pull-ups, step-ups and dips [source: Parker].

What else will prepare you for an ice climb?

Advertisement

Ice Climbing Equipment

A Colorado ice climber plants his ice tool in the ice.
Gabe Rogel/Getty Images

Ice climbing requires different equipment from regular snow. There are tons of tools to choose from -- depending on your skill, your terrain and your personal preference.

Ice tools are the most important and most expensive pieces of equipment an ice climber needs. When climbers talk about their ice tools, they're referring to what people often call axes. An ice tool does in fact act like an axe. You swing it into the ice and then use it as a grip while you push yourself up with your legs. The head of the tool is double-sided, with a pick on one side and an adze, a chisel-like tool used for chopping holes in ice, or hammer on the other. There are two varieties of ice tools -- traditional and leashless.

Advertisement

A traditional ice tool includes a leash that you wrap around your hand to help you keep hold of the tool. It's quite easy to drop a tool, and your tool does nothing for you if it's lying 20 feet (6 meters) below you on the ground. A leashed tool also comes in handy if you lose your footing and need to hang from the ice until you regain it. Of course, your rope and belay will also hold you, so your ice tool is not your sole protection.

The leashless ice tool, on the other hand, is less awkward, and it's easier to switch out tools when you're not tied to your gear. Leashless tools are becoming more popular among experienced climbers because of their flexibility. Ice tools come in all different weights and sizes, and many climbers carry several tools, depending on what sort of climb they're doing. Prices for ice tools run anywhere from $100 to $350.

Crampons enable ice climbers to get a foothold.
Terje Rakke/Getty Images

As we mentioned earlier, crampons are necessary for a climber to gain traction on snow and ice. Like cleats, crampons are sharp metal spikes that protrude from the bottom of your boots and dig into the ice as you climb. You may clip or strap crampons to the bottom of your boots, or wear boots with the crampons built-in. You also need to decide if you want to use mono-point or dual-point crampons. Crampons generally have spikes that stick out in the front of the shoe and usually make first contact with the ice. Mono-point crampons have a single point in front, whereas dual-point crampons have two points in front. Each type has its advantages. Mono-points tend to be more flexible for mixed climbing, when your terrain varies from ice to rock over the course of the climb. Mono-points provide better ice penetration, and dual-points offer more stability but less ice penetration. Some crampons also feature heel spurs.

Ice climbers protect themselves from falling by utilizing ice screws and ropes. Climbers call this process protection. As you progress through a climb, you place ice screws in strategic areas and clip in a rope, which will save your life if you fall. Well-placed screws can support hundreds of pounds of force. But remember -- ice screws are only as strong as the ice in which you've screwed them. We'll talk more about ice climbing safety measures later in this article.

Don't forget your helmet! You'll need it to protect your head and eyes from falling chunks of ice. And of course, appropriate cold weather clothing and gloves are necessary.

Now that you have your equipment, let's learn how to climb.

Advertisement

Choosing Your Ice Climb

How solid is this ice? An ice climber at Wicked Wanda in British Columbia, Canada
Jimmy Chin/Getty Images

If you're new to ice climbing, there are dozens of climbing clubs that offer guidance and lessons on how to select safe terrain. Seasoned climbers, however, are always searching for that untouched and private piece of ice. North America has many ice climbing destinations -- Alberta, Colorado, Ontario, Alaska, New Hampshire, Montana and more. Across the pond, people flock to Norway, the French Alps, Iceland and Greece to climb ice. Anywhere you find water and low temperatures, you find ice climbs.

In the mountains, ice forms two ways: Alpine ice starts as snow and over time consolidates into hard-packed ice, sometimes called blue ice. Water ice, which forms anywhere you find runoff or seepage, is more varied. It may melt and freeze, form over snow, create large bumps and ridges and turn into icicles. Climbers like to fantasize that the ideal ice for climbing would start to form in the autumn, and the water source would be a rivulet seeping out of a rock wall. As the temperatures drop, the ice would become stronger and stronger and finally bond itself to the rock wall, creating an extremely strong surface on which to climb. Ideal temperatures to form ice for climbing is between 14 and 30 degrees F (minus 10 and minus 1 degree C). Colder temperatures cause more ice to form more quickly, but it will take a while for the ice bonds to become strong.

Advertisement

How do you know if ice is safe to climb? Ice can go from hard to brittle to slushy all in one day. Hard ice is very cold ice, packed with gravel and dirt, and a climber must use a lot of strength to penetrate this ice with the pick. When temperatures are well below freezing, you may encounter brittle ice, which tends to break off in plates when you swing your tool into it. Climbers call this unwelcome phenomenon dinner plating. Sometimes you can prevent dinner plating by using a light tapping method with your tool to gently get your pick into the ice. But if plating is inevitable, you may want to swing into the ice with force to clear everything in one go. When temperatures are near or above freezing, the ice will feel more like plastic. Your pick will sink in quickly and stay there, making climbing easier and faster. If temperatures are warming to above freezing, however, ice will become slushy and soft. Obviously, slushy ice won't support your pick or protection very well.

A good climber should be able to climb well on any type of ice, especially since you may encounter different kinds of ice on a single climb. Sometimes you can spec out the ice just by looking at it. Solid ice tends to look blue or blue-green and it may be stained yellow from minerals. White ice is usually full of air -- it's easy to climb but it may not support your ice screws. Chandelier ice is actually hundreds of fused icicles, and it's difficult to climb safely because it's not solid enough for ice screws.

When choosing your climb, use these cues to choose the safest area and look out for hanging icicles or unstable ice that could fall on you as you climb.

Advertisement

Ice Climbing Techniques

Laurence Gouault competes in the women's ice climbing competition at the ESPN X-Games. Notice her triangle-shaped form as she climbs.
Mike Powell/Getty Images

For basic climbing techniques, you'll need to refer to "How Rock Climbing Works". Here, we'll teach you about methods specific to ice climbing -- from how to correctly use your crampons to perfecting the swing of your pick.

Based on the terrain, ice climbers alternate between two basic techniques. The French technique, or flat flooting, works best on low-angled slopes. You open your feet up and walk like a duck, which keeps all crampon points flat on the ice. As a slope's angle increases, this technique will become harder on your ankles, so you should switch to sidestepping. But sidestepping can be tricky because it's easy to snag one foot as it passes over the other. The German technique known as front pointing works best on very steep or vertical terrain. You kick your front crampon right into the ice and then step up.

Advertisement

Your mental picture of an ice climber may be a figure dangling from a glacier. But ice climbing also includes low-level walks in crampons. If you're walking on level or low-angle ice, you probably don't need your ice tool. But if you're doing a vertical ice climb, you'll need it. It's more difficult than it looks to properly swing an ice tool. Bad swings may cause ice to break off, and your energy will be sapped because you'll have swing multiple times for one stick. The only way to improve a swing is practice. Keep the elbow high and align it with both the hand and the tool. The straighter the swing, the more precise. With a good stick, the tool makes a satisfying "thunk" sound, as if it's been planted in concrete. You want a stick that will support your weight in case you lose your footing. If the tool doesn't feel planted correctly, pull it out and try again. Aim for spots where the ice looks strong -- convex-looking ice will usually plate and shatter. Sometimes dinner plating your way through bad ice can reveal stronger ice beneath. As the shattered ice falls, you'll be thankful for your helmet.

When you do a vertical climb, you'll go through the following motions: Find good footing, swing your tool into the ice, step up with both feet, swing higher, step up again and so on. Each time you land your pick in the ice, you should move both feet up. Placing your feet is as important as placing your ice tool. You'll usually have to kick your crampons into the ice a few times to achieve solid placement unless the ice is soft. Your feet should always support more weight than your arms, so finding good footholds is paramount. Keep your body in a triangle shape, with your legs shoulder-width apart and your pick at the center. Keep your heels down as much as possible. Other ice climbing techniques include:

  • Cane: using your ice tool like a cane when traversing relatively flat terrain
  • Cross-body: used in conjunction with sidestepping, where you turn your body sideways to the slope
  • Low dagger: pushing your pick into the slope around waist or chest level, holding it by the head
  • High dagger: pushing your pick into the slope up above your head
  • Anchor: similar to high dagger, but you hold your axe at the bottom and pull yourself up by working your way up the shaft
  • Traction: used for very steep ice and with two tools, swinging them overhead and planting one at a time, as you make your way upward

With practice, you'll find which techniques work best for the terrain you face. Climbing up a vertical piece of ice is about as dangerous as it sounds. So let's learn about safety and protection.

Advertisement

Ice Climbing Safety: How to Avoid Ice Climbing Accidents

Ice climber Dietmar Scherz climbs a glacier while Christian Stransky belays him at Rettenbachgletscher in Soelden, Austria.
Sandra Behne/Bongarts/Getty Images

Ice climbing is dangerous in more ways than one. First of all, you need to protect your body from the elements by wearing layered clothing and dry gloves. Avalanches can happen without warning. Austrian climber Hari Berger died in 2006 after becoming trapped under 150 tons of ice during a routine training session [source: snow. But without a doubt, the biggest precaution you must take while ice climbing is employing fall protection.

Ice climbers, like rock climbers, use belays as a safety measure during climbs. In fixed belaying, the climber wears a harness with a rope attached, and the rope prevents him or her from falling very far in case of a slip. Climbers usually belay in pairs, with a designated partner who remains on the ground and controls the rope. (Read more about the mechanics of belaying in "How Rock Climbing Works".) If more than one person is climbing, they employ running belays. As the lead climber progresses up the slope, he or she will place ice screws and clip the rope into those screws. The follower continues behind the leader, removing the lowest ice screws along the way. In a running belay, all climbers and ropes are on the ice, moving together. Experts recommend having at least two ice screws anchored at all times for backup safety. Climbers can also carve their own anchors out of ice -- this anchor is called a bollard -- and place the rope around those. Another option is to create a 'V'-shaped tunnel with ice screws, which is called an Abalakov after its innovator, and run the rope through that tunnel. Of course, the latter options take much longer to set up. Sometimes you can find natural anchors -- strong ice columns or rock protrusions.

Advertisement

When placing ice screws, it's important to ensure they're solidly secured in the ice. Clear away any soft ice or snow and start a hole using the pick on your ice tool. Secure the screw at about a 10-degree angle uphill from the direction of expected pull. The pull is the direction in which the rope will pull in the event of a fall. This means that if you're climbing on a steep or vertical surface, the screw would face slightly downward. Make sure you place screws at least 2 feet (0.6 meters) apart. Advancements in screw designs, like rotating handles, make it less laborious to get them into the ice. Keeping your screws sharpened and clean will also make this process easier.

Remember that once you reach the top, you'll still need to get back down. Plan your climb so you have enough time to make a safe descent. Nobody wants to climb down the side of an icy slope in the dark. You'll probably be tired and sore on the way down, so be extra careful.

Climbers should always carry first aid kits along with their gear. The pros advise a working knowledge of first aid, including how to apply a tourniquet, splint or treat frostbite. Gadgets, too, are every climber's friend. A handheld GPS device can help you find your way in the deep wilderness. Carrying an avalanche beacon is a lifesaver, assisting rescuers in locating you and your friends should you end up in that scary situation. And don't forget a shovel. It doesn't need batteries and can help you out of snow.

Advertisement

Lots More Information

Related Articles

More Great Links

  • Burns, Cameron M. "An Ice Climbing Primer." 2008. (Sept. 27, 2008) http://gorp.away.com/gorp/activity/climb/ice_primer.htm
  • Dewell, Dan. "Berger Dies in Ice Climbing Accident." Climbing. Dec. 20, 2006. (Sept. 27, 2008) http://www.climbing.com/news/hotflashes/hariberger/
  • Gadd, Will. "Ice and Mixed Climbing: Modern Technique." The Mountaineers Books. 2003. (Sept. 27, 2008)
  • "Introduction to Ice Climbing." Discovery Channel. 2008. (Sept. 27, 2008)http://dsc.discovery.com/tv/fearless-planet/adventure-sports/ice-climbing/ice-climbing.html
  • "Ice Climbing Crampons." CascadeClimbers.com. 2006. (Sept. 27, 2008)http://cascadeclimbers.com/ice/gear/ice-crampons
  • "Ice Climbing Techniques and Skills." ABC-of-Ice-Climbing. 2008. (Sept. 27, 2008) http://www.abc-of-iceclimbing.com/info/iceclimbing-techniques.asp
  • "Jeff Lowe: Resume." Ogden Climbing Parks. 2007. (Sept. 27, 2008) http://www.ogdenclimbingparks.com/pages/Jeff_Lowe.html
  • Luebben, Craig. "How to Ice Climb." Globe Pequot Press. 1999. (Sept. 27, 2008)
  • Parker, Carolyn. "Training for Ice Climbing." Chicks With Picks. 2007. (Sept. 27, 2008) http://www.chickswithpicks.net/training.html
  • Regenold, Stephen. "Ice-Climbing Destinations." New York Times. Jan. 15, 2006. (Sept. 27, 2008) http://www.nytimes.com/2006/01/15/travel/15explorerbx.html
  • REI Staff. "Ice Climbing -- Waterfalls and Alpine Walls." 2008. (Sept. 27, 2008)http://www.rei.com/expertadvice/articles/ice+climbing+waterfalls+alpine+walls.html

­

Advertisement

Loading...